NCH VRS as Analog Multi Track Recording System
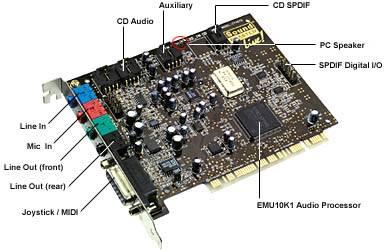
VRS use PCs sound card as its analog recording source. It has the capability to record left and right audio-in as two independent sound sources. If sufficient PCI slots are free, one can install three to four sound cards in one PC, thus providing 6 to 8 audio input recodings. USB audio input can increase the capacity even beyond that. Please read the software details from the NCH site. Following steps should already be done before reading the subsequent paragraphs:
1. All sound cards must have been installed with their appropriate drivers, there should be no conflict or yellow marker in the device manager.
2. NCH VRS should be correctly installed.
In case above is not done please google for correct driver installtion for the sound cards. Software installtion help is avaialbe at NCH site.
Step 1

Confirm correct installation by opening ‘device manager’ in system properties. In this example three sound cards appropriately installed are visible.
Step 2
Open VRS, click ‘Options’ and select ‘Channels’ tab.
It is better to first remove all channels, if some configuration is already done.
Click ‘Add’, which will open the ‘Channel Properties’, do following settings:
It is better to first remove all channels, if some configuration is already done.
Click ‘Add’, which will open the ‘Channel Properties’, do following settings:
- Channel name: Give any name for your reference, e.g if you are attaching a Microphone give its name (mic 1), or telephone number in case of phone monitoring. A meaningful name will help in subsequent search/ archive.
- Record Device: Select a sound card, sequence does not matter. Each sound card can give two recording channels, as left or right audio. Thus each sound card will be selected for two lines.
- Select radio button ‘Left Input as Mono’ or ‘Right input as mono’ as required.
- Record Input: Select ‘Line in’. This step is very important, as wrong selection here will confuse the equipment connections. Line in jack of sound card is usually color coded as BLUE.
- Record Volume: This may be adjusted later, by testing the recording threshold.
- Record File Folder: is the path where recording for this particular channel will be saved. Diff paths can be given for diff recording inputs.
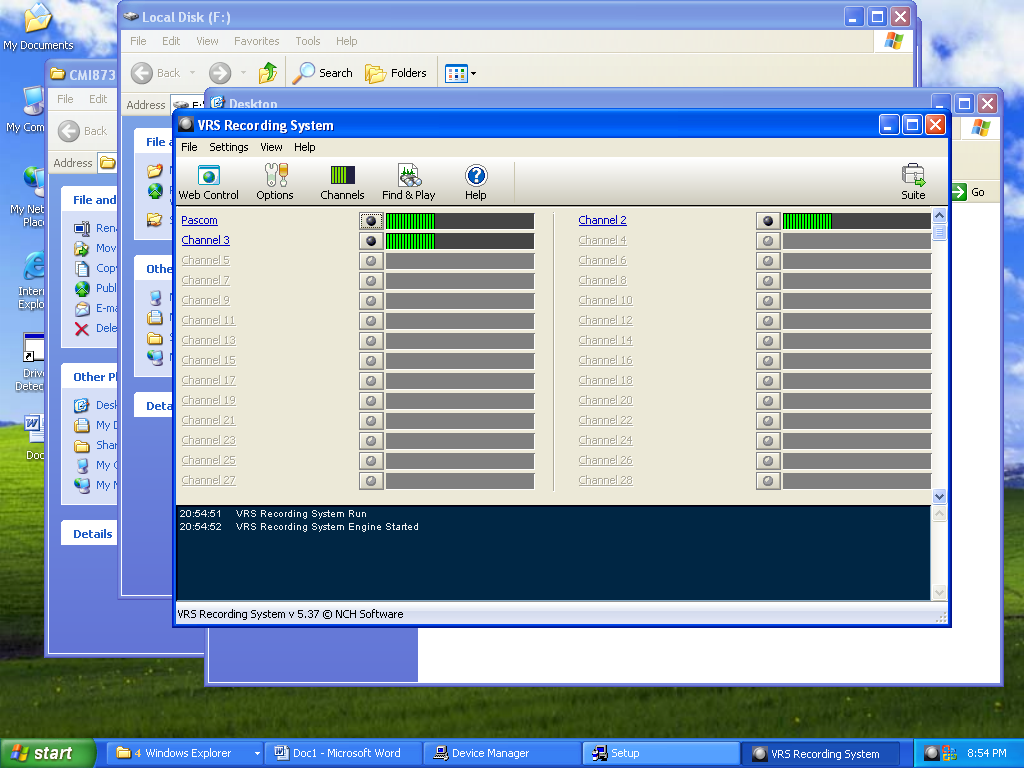


- After all above settings, Options/channel tab would look similar to this:
- ‘Hardware record sample rate:’ may not be changed here.
- Under the ‘channel properties’, start/ stop option can be changed from manual to voice activated. Detect threshold may be set after testing. It should not be too sensitive to record noise all the time, nor it should be too high that it misses the recording.
- Recording quality can be changed under ‘Options’ Recording tab. It is better to use .mp3 format.
- Detail button next to .mp3 will open fol box. 128kbps bitrate and Mono ‘Channel encoding mode’ will make recording file roughly 1MB per minute.
Step 3
Hardware connection
Use 3.5mm stereo jack, on ‘line in’ which is usually color coded in BLUE in PC soundcards.
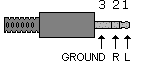
Typical pinout is as under. Make sure to use correct lines to match with the inputs configured in VRS.
Name Position Number
L (Left Signal) Tip 1
R (Right Signal) Ring 2
GND (Ground) Sleeve 3
See telephone line tap circuit